该站点使用 mdBook 生成
这是Rebornbuddy(FF14 Bot) 的一些资料
这是简易的 Order Bot 编写指南,只是我个人使用过程中总结的.
Order Bot 绝大部分功能由以下两个开源项目实现
如果帮助到了你。记得去给人买杯咖啡.^__^
有用的代码段,帮助编写Profile文件
使用方式:
插件 => Rebornconsole => meow => 代码块复制进窗口=> run
############################################### ###########################

Name: 当前区域,坐标, 天气
--------------------------------------------------
ClearLog();
Log("Zone Id: {0} | Raw Zone Id: {1} | Subzone Id: {2}",WorldManager.ZoneId,WorldManager.RawZoneId,WorldManager.SubZoneId);
Log("Current XYZ: {0}",Core.Player.Location);
Log("Current Weather: {0} | Current WeatherId: {1}",WorldManager.CurrentWeather,WorldManager.CurrentWeatherId);
Log("============================================= =====");
foreach(var Aetheryte in WorldManager.AetheryteIdsForZone(WorldManager.ZoneId))
{
Log("Current Zone Aetheryte ID: {0}",Aetheryte.Item1);
}
--------------------------------------------------

Name:  附近的物体(最接近的在顶部)。
--------------------------------------------------
ClearLog();
var units = GameObjectManager.GameObjects;
foreach(var unit in units.OrderBy(r=>r.Distance()))
{
Log("Name:{0}, Type:{3}, ID:{1}, Obj:{2}",unit,unit.NpcId,unit.ObjectId,unit.GetTyp e());
}
Log("============================================= =====");
foreach (var x in GameObjectManager.GetObjectsOfType<BattleCharacter >(true).OrderBy(r=>r.Distance()))
{
Log("Name: " + x.EnglishName + ", Level: " + x.ClassLevel);
}
--------------------------------------------------

Name: Aetheryte ID列表
--------------------------------------------------
ClearLog();
foreach(var item in DataManager.AetheryteCache)
{
Log("ID: {0} | Location: {1}",item.Key,item.Value);
}
--------------------------------------------------

Name: 当前任务
--------------------------------------------------
ClearLog();
foreach(var quest in QuestLogManager.Quests())
{
Log(quest);
}
--------------------------------------------------

Name: 渔场tag生成
--------------------------------------------------
ClearLog();
string location = Core.Player.Location.ToString().Remove(0, 1);
location = location.Remove(location.Length - 1, 1);
Log("<FishSpot XYZ="" + location + "" Heading="" + Core.Me.Heading + "" />");
--------------------------------------------------

Name: 背包所有物品
--------------------------------------------------
ClearLog();
Log("============================================= =====");
Log("======================GEAR=================== =====");
Log("============================================= =====");
Log(" ");

foreach(var item in InventoryManager.GetBagByInventoryBagId(ff14bot.En ums.InventoryBagId.EquippedItems).FilledSlots)
{
Log("Name: " + item.Item.EnglishName + "\tItemCategory: " + item.Item.EquipmentCatagory + "\tId: " + item.Item.Id);
}
Log(" ");
Log("============================================= =====");
Log("====================INVENTORY================ =====");
Log("============================================= =====");
Log(" ");

foreach(var item in ff14bot.Managers.InventoryManager.FilledSlots.Wher e(x => x.BagId == InventoryBagId.Bag1 || x.BagId == InventoryBagId.Bag2 || x.BagId == InventoryBagId.Bag3 || x.BagId == InventoryBagId.Bag4))
{
Log("Name: " + item.Item.EnglishName + "\tItemCategory: " + item.Item.EquipmentCatagory + "\tId: " + item.Item.Id);
}
Log(" ");
Log("============================================= =====");
Log("====================KEY ITEMS=====================");
Log("============================================= =====");
Log(" ");
foreach(var bagslot in InventoryManager.GetBagByInventoryBagId(ff14bot.En ums.InventoryBagId.KeyItems).FilledSlots)
{
Log(bagslot);
}
--------------------------------------------------

Name: 详细的目标信息(必须先选中东西)。
--------------------------------------------------
ClearLog();
GameObject s = GameObjectManager.GetObjectByNPCId(Core.Target.NpcId);
Log("Can Attack - " + s.CanAttack.ToString());
Log("Combat Reach - " + s.CombatReach.ToString());
Log("Current Health Percent - " + s.CurrentHealthPercent.ToString());
Log("English Name - " + s.EnglishName.ToString());
Log("Fate ID - " + s.FateId.ToString());
Log("Heading - " + s.Heading.ToString());
Log("Id Location - " + s.IdLocation.ToString());
Log("Is Behind - " + s.IsBehind.ToString());
Log("Is Fate Gone - " + s.IsFateGone.ToString());
Log("Is Flanking - " + s.IsFlanking.ToString());
Log("Is Me - " + s.IsMe.ToString());
Log("Is Targetable - " + s.IsTargetable.ToString());
Log("Is Valid - " + s.IsValid.ToString());
Log("Is Visble - " + s.IsVisible.ToString());
Log("Location - " + s.Location.ToString());
Log("LUA String - " + s.LuaString.ToString());
Log("Max Health - " + s.MaxHealth.ToString());
Log("Name - " + s.Name.ToString());
Log("NPC ID - " + s.NpcId.ToString());
Log("Object Id - " + s.ObjectId.ToString());
Log("Type - " + s.Type.ToString());
--------------------------------------------------

Name: 远程窗口检查
--------------------------------------------------
ClearLog();
Log("ColosseumRecord Open? {0}",ff14bot.RemoteWindows.ColosseumRecord.IsOpen);
Log("ContentsFinder Open? {0}",ff14bot.RemoteWindows.ContentsFinder.IsOpen) ;
Log("ContentsFinderConfirm Open? {0}",ff14bot.RemoteWindows.ContentsFinderConfirm.IsOpen);
Log("ContentsFinderReady Open? {0}",ff14bot.RemoteWindows.ContentsFinderReady.IsOpen);
Log("CraftingLog Open? {0}",ff14bot.RemoteWindows.CraftingLog.IsOpen);
Log("HousingGardening Open? {0}",ff14bot.RemoteWindows.HousingGardening.IsOpen);
Log("JournalAccept Open? {0}",ff14bot.RemoteWindows.JournalAccept.IsOpen);
Log("JournalResult Open? {0}",ff14bot.RemoteWindows.JournalResult.IsOpen);
Log("MaterializeDialog Open? {0}",ff14bot.RemoteWindows.MaterializeDialog.IsOpen);
Log("Repair Open? {0}",ff14bot.RemoteWindows.Repair.IsOpen);
Log("Request Open? {0}",ff14bot.RemoteWindows.Request.IsOpen);
Log("SelectIconString Open? {0}",ff14bot.RemoteWindows.SelectIconString.IsOpen);
Log("SelectString Open? {0}",ff14bot.RemoteWindows.SelectString.IsOpen);
Log("SelectYesno Open? {0}",ff14bot.RemoteWindows.SelectYesno.IsOpen);
Log("Synthesis Open? {0}",ff14bot.RemoteWindows.Synthesis.IsOpen);
Log("Talk Open? {0}",ff14bot.RemoteWindows.Talk.DialogOpen);
Log("ShopExchangeCurrency Open? {0}",ff14bot.RemoteWindows.ShopExchangeCurrency.Open);
--------------------------------------------------

Name: 天气列表
--------------------------------------------------
ClearLog();
foreach(var item in WorldManager.WeatherDictionary)
{
Log("ID: {0} | Type: {1}",item.Key,item.Value);
}
--------------------------------------------------

Name: 获取Todo参数(XXXX=任务ID)。
--------------------------------------------------
ClearLog();
Log(QuestLogManager.GetQuestById(XXXXX).GetTodoArgs(0));
Log(QuestLogManager.GetQuestById(XXXXX).GetTodoArgs(1));
--------------------------------------------------

Name: 任务参数(XXXX=任务ID)。
--------------------------------------------------
ClearLog();
Log(ff14bot.NeoProfiles.ConditionParser.IsQuestAcceptQualified(XXXXX));
Log(ff14bot.NeoProfiles.ConditionParser.IsQuestCompleted(XXXXX));
Log(ff14bot.NeoProfiles.ConditionParser.HasQuest(XXXXX));
Log(ff14bot.NeoProfiles.ConditionParser.GetQuestStep(XXXXX));
Log(ff14bot.NeoProfiles.ConditionParser.GetQuestById(XXXXX).QuestI8AH);
--------------------------------------------------

Name: 活跃的FATE属性
--------------------------------------------------
ClearLog();
foreach (var fate in FateManager.ActiveFates)
{
Log("IsValid: " + fate.IsValid + " | Level: " + fate.Level + " | Status: " + fate.Status + " | " + fate.Name);
}
--------------------------------------------------

Name: 距离检查
--------------------------------------------------
ClearLog();
Log(Core.Me.Location.Distance3D(new Vector3(0.0f, 0.0f, 0.0f)));
--------------------------------------------------

Name: 当前的动作
--------------------------------------------------
ClearLog();
foreach(var action in Actionmanager.CurrentActions) { Log(action); }
--------------------------------------------------

Name: 当前打开的所有窗口
--------------------------------------------------
ClearLog();
foreach (var window in RaptureAtkUnitManager.Controls)
{
Log(window);
}
<TalkTo></TalkTo>
功能:和NPC对话完成任务(对话=>播放动画=>....=>完成任务. 这种流程一般使用该标签)
参数:
- NpcId
- 必填
- QuestId
- 必填
- XYZ
- 必填
<TurnIn></TurnIn>
功能: 完成上交物品任务
参数:
- ItemIds (多个使用 , 隔开)
- 必填
- NpcId
- 必填
- QuestId
- 必填
- XYZ
- 必填
<LLPickUpQuest></LLPickUpQuest>
功能: 需要选择选项然后完成任务.
参数:
- InteractDistance
- 可选
- NpcId
- 必填
- SelectStringSlot(对话后选择第几个插槽, 从0开始.)
- 可选
- XYZ
- 必填
- DialogOption (多个使用 , 隔开)
- 可选
<!-- 任选其一 -->
<PickupDailyQuest></PickupDailyQuest>
<PickUpDailyQuest></PickUpDailyQuest>
<PickUpQuest></PickUpQuest>
<PickupQuest></PickupQuest>
功能: 完成任务
参数:
- InteractDistance
- 可选
- NpcId
- 必填
- SelectStringSlot(对话后选择第几个插槽, 从0开始.)
- 可选
- XYZ
- 必填
Python
原文出自:Getting Started with Asyncio in Python
Asyncio在3.4版本中成为Python生态系统的一部分,从那时起成为大量Python库和框架的基础,因为它具有令人印象深刻的速度和易用性。 Asyncio允许您轻松编写使用称为协程的单线程并发程序,这些协同程序就像一个简化的线程。
Asyncio还能很好地让从复杂的操作中抽身出来,例如通过套接字多路复用I / O访问,它还通过提供一组同步原语来简化我们的工作,使我们能够使程序具有线程安全性。
入门:
为了开始使用asyncio,我们需要一个关键组件,即事件循环。所有基于asyncio的系统都需要一个事件循环,这是我们程序性能的关键。事件循环调度我们的asyncio.coroutines并处理所有繁重的工作。
我们可以定义一个事件循环,只需在coroutine上执行,如下所示:
import asyncio


async def my_coroutine():
    print("简单的事件循环实例")


def main():
    # 定义事件循环的实例
    loop = asyncio.get_event_loop()
    """
    告诉此事件循环运行,直到分配给它的所有任务完成。 在这个例子中只是执行my_coroutine()协程。
    """
    loop.run_until_complete(my_coroutine())
    # 通过调用close()来关闭我们的循环
    loop.close()


if __name__ == '__main__':
    main()
当你运行它时,你应该看到我们的my_coroutine()成功执行。
现在你要吐槽了,这似乎并不能给我们带来什么好处。只有额外的代码····
对于这个列子他似乎是没提供太多的好处,但是在更复杂的情况下。我们就会看到真正的性能优势。
我建议查看我在 aiohttp和Python中创建REST API 的教程。这提供了一个更复杂的示例,并且是高性能asyncio的一个很好的示例。
协程
因此,这些 coroutines 基本上是更传统线程的轻量级版本。通过使用这些,我们基本上使自己能够编写与线程非常相似的异步程序,但它们运行在单个线程之上。我们可以用两种不同的方式定义协同程序。
import asyncio

async def myFunc1():
    print("协程 1")

@asyncio.coroutine
def myFunc2()
    print("协程 2")
第一种方法是在Python 3.5中引入的,我倾向于建议你使用这种方法而不是后者。
Futures
Asyncio中的Futures 与在Python ThreadPoolExecutors 或者 ProcessPoolExecutors 看到的十分类似。并且遵循几乎相同的实现。
创建 Futures 对象的目的是为了在将来的某个时间给出一个结果,因此而得名。这是非常有好处的,因为这将意味着在您的Python程序中,您可以在等待 Future 返回结果时执行其他任务。
值得庆幸的是,在Asyncio中与 Futures 结合的方法非常容易。这样归功于 ensure_future() 方法,该方法接受一个协程并返回该协程的 Future 版本。
import asyncio


# 定义一个协程,它接受一个future
async def my_coroutine(future):
    # 模拟一些'工作'
    await asyncio.sleep(1)
    # 设置结果给 future 对象
    future.set_result("Coroutine 转 Futures 已经完成")


async def main():
    # 定义一个 future 对象
    future = asyncio.Future()
    # 等待我们使用 ensure_future() 函数 将 coroutine 转换为 Futures 对象完成
    await asyncio.ensure_future(my_coroutine(future))
    # 打印 futures 的结果
    print(future.result())

# 启动快速简单的事件循环并运行直到完成
loop = asyncio.get_event_loop()
try:
    loop.run_until_complete(main())
finally:
    loop.close()
如果 你运行了它,应该看到我们程序成功的将我们的协程转换为了 Futures 对象并打印出了结果。
多个协程
现在让我们尝试利用asyncio同时运行多个协同程序的能力。这将有助于您了解asyncio的强大功能以及如何使用它来有效地创建在单线程上运行的令人难以置信的高性能Python程序。
让我们从创建一个简单的协程开始,该协程将id作为其主要参数。 我们生成十个任务,然后给 await asyncio.gather() 函数传入我们的任务列表,它将等待这些任务完成。最后,我么将使用前一个示例中相同的事件循环来运行我们的Asyncio程序。
import asyncio
import random


async def my_coroutine(_id):
    process_time = random.randint(1, 5)
    await asyncio.sleep(process_time)
    print("协程: {}, 在 {} 秒后成功完成".format(_id, process_time))


async def main():
    tasks = []
    for i in range(10):
        tasks.append(asyncio.ensure_future(my_coroutine(i)))

    await asyncio.gather(*tasks)


loop = asyncio.get_event_loop()
try:
    loop.run_until_complete(main())
finally:
    loop.close()
我们的协程会同时执行并在不同的时间执行完成。需要重点注意,这些任务并没有按照提交的顺序完成。如果你执行上述程序,则需要5S才能完成执行。
结论:
这只是对asyncio框架的一个非常快速和简单的介绍。我们将在以后的教程中更详细地介绍这个框架。
原文出自:Asyncio Synchronization Primitives Tutorial - Queues and Locks
在本教程中,我们将查看Asyncio编程冒险中可用的各种同步原语。我们将简要介绍为什么这些同步原语很重要,以及在简单的基于Asyncio的程序中使用它们的各种方法。
为什么这些很重要?
在编写并发系统时,您必须尝试确保您的程序没有称为 Race Condition 的小东西。当多个并发工作者同时尝试修改共享变量,数组等时,会发生竞争条件,并且由于时序问题,它们产生错误的结果。
由于存在这些竞争条件,我们必须利用称为同步原语的东西。当谈到Asyncio中的同步原语时,我们有一个数字可供选择。这些都基于线程模块等价物,并且往往具有与我们一起使用的相同API。
Locks
描述锁如何工作的最好类比是想象有一群人试图进入浴室。一个人进去并锁上门,这样做可以防止他人在你正在洗澡时进来。
在计算术语中我们锁定某些东西的时候,我们基本上阻止了其他人操作修改我们锁定的资源。
一个简单的locks示例
在这个例子中,我们将创建一个 asyncio.Lock() 实例,我们将尝试使用 with await lock 获取此锁。一旦我们的 Worker 获得了这个锁,我们就会执行我们的关键代码部分,然后继续释放我们刚刚获得的锁。
import asyncio
import time


async def my_worker(lock):
    print("试图获得lock")
    # 获得lock
    with await lock:
        # 运行代码的关键部分
        print("目前已锁定")
        time.sleep(2)
    print("解锁的关键部分")


async def main():
    # 实例化一个锁
    lock = asyncio.Lock()
    # 等待执行2个Worker协程,每个协程都传入相同的锁实例
    await asyncio.wait([my_worker(lock), my_worker(lock)])

# 启动一个简单的循环并运行我们的main函数直到它完成
lock = asyncio.Lock()
loop = asyncio.get_event_loop()
loop.run_until_complete(main())
print("所有任务都完成了")
loop.close()
输出:
当我们运行这个时,你应该看到我们只有一个同时运行的Works能够一次运行.
Queues
在以同步方式进行通信时,asyncio提供了自己的基于队列的实现. 我们可以让生产者以同步的方式将事物推送到我们的队列中,并让消费者同时轮询这个队列以获取推送到它上面的任何东西。
简单的示例:
在这个例子中,我们将创建一个 newsProducer() 协程和一个 newsConsumer() 协程。
newsProducer() 协程 将会推送新的新闻项目到我们的同步队列,newsConsumer() 协程将尝试检索已被推入到所述队列的任何项目,然后在获得消息是打印出来。
import asyncio
import random


async def news_producer(my_queue):
    while True:
        await asyncio.sleep(1)
        print("将新闻项目放入队列")
        await my_queue.put(random.randint(1,5))


async def news_consumer(_id, my_queue):
    print(my_queue)
    while True:
        print("消费者:{} 试图从队列中获取".format(_id))
        item = await my_queue.get()
        if item is None:
            # 没有生产者发送的数据是,表面她已经完成了
            break
        print("消费者:{} 使用ID为 {} 的文章".format(_id, item))


loop = asyncio.get_event_loop()
my_queue = asyncio.Queue(loop=loop, maxsize=10)
try:
    loop.run_until_complete(asyncio.gather(news_producer(my_queue),
                                           news_consumer(1, my_queue), news_consumer(2, my_queue)))
except KeyboardInterrupt:
    pass
finally:
    loop.close()
输出
当我们尝试运行它时,您应该看到我们的生产者将项目推送到我们的队列中,然后我们的消费者彼此竞争以便将任何内容取出队列。
结论
如果您发现本教程有用或需要进一步的帮助,请在下面的评论部分告诉我们!
原文出自:Asyncio Tasks Tutorial
Note: 作者在源代码中使用的time.sleep 正确应该使用asyncio.sleep
在本教程中,我们将介绍Asyncio中的Tasks。我们将在之前的 Asynci事件循环教程 之上构建。
Tasks
Asyncio中的Tasks负责在事件循环中执行协同程序。这些 Tasks 一次只能在一个事件循环中运行,为了实现并行执行,您必须在多个线程上运行多个事件循环。
I like to think of tasks within asyncio in a similar regard to how we’d think of tasks when used in conjunction with executors or pools like we’ve demonstrated in previous chapters.
在本节中,我们将介绍一些关键函数,我们可以使用这些函数来处理基于asyncio的程序中的任务
一个简单的例子
关于Asyncio中Task的关键注意事项之一是您不直接创建它们,而是使用ensure_future函数或AbstractEventLoop.create_task() 方法. 让我们快速浏览一下如何使用任务生成器函数来生成5个不同的任务,以便我们的事件循环进行处理。
import asyncio
import time


async def my_task():
    asyncio.sleep(1)
    print("Task 进程")


async def my_task_generator():
    for i in range(5):
        asyncio.ensure_future(my_task())

loop = asyncio.get_event_loop()
loop.run_until_complete(my_task_generator())
print("所有任务已完成")
loop.close()
现在让我们看一下如何使用 all_tasks() 方法检索所有任务。
all_tasks(loop=None)方法
能够确定当前正在处理的任务对于生产中需要能够预测工作量等事物的系统来说非常重要。
all_taks 方法让我们深入了解在事件循环执行之前哪些任务当前处于挂起状态。
import asyncio
import time


async def my_task():
    asyncio.sleep(1)
    print("Task 进程")


async def my_task_generator():
    for i in range(5):
        asyncio.ensure_future(my_task())

    pending = asyncio.Task.all_tasks()
    print(pending)

loop = asyncio.get_event_loop()
loop.run_until_complete(my_task_generator())
print("所有任务已完成")
loop.close()
我们打印了一组5个不同的任务,您可以看到它们都处于挂起状态。
cancel() 函数
在您对正在执行的任务数量进行速率限制的情况下,或者您尝试正常关闭应用程序时,能够有效取消挂起的任务非常有用。值得庆幸的是,asyncio API提供了相对容易完成的必要函数。
import asyncio
import time


async def my_task():
    asyncio.sleep(1)
    print("Task 进程")
    for task in asyncio.Task.all_tasks():
        print(task)
        task.cancel()
        print(task)


async def my_task_generator():
    for i in range(5):
        asyncio.ensure_future(my_task())


loop = asyncio.get_event_loop()
loop.run_until_complete(my_task_generator())
print("所有任务已完成")
loop.close()
Noet:
请注意,除了 main() 任务之外的所有任务在我们调用 task.cancel() 后都会从挂起到取消。
Task 函数
因此,我们看看我们如何与各个任务进行交互,但现在让我们退后一步,看看我们如何作为一个集体与他们互动。
as_completed() 函数
import asyncio


async def my_worker(number):
    return number * 2


async def main(coros):
    for fs in asyncio.as_completed(coros):
        print(await fs)


coros = [my_worker(1) for i in range(5)]

try:
    loop = asyncio.get_event_loop()
    loop.run_until_complete(main(coros))
except KeyboardInterrupt:
    pass
finally:
    loop.close()
gather() 函数
gather() 函数返回一个单独的future,它汇总了传递给它的给定协程的所有结果。您应该注意,结果不会按照提交的顺序返回,因此如果您关心顺序,那么您将必须实施一些管理功能来重新排序结果。
import asyncio


async def my_worker():
    print("Hello World")


async def main():
    print("My Main")

try:
    loop = asyncio.get_event_loop()
    loop.run_until_complete(asyncio.gather(*[my_worker() for i in range(5)]))
except KeyboardInterrupt:
    pass
finally:
    loop.close()
wait() 函数
wait() 函数只是阻塞,直到传递给它的Future实例完成,完成后,它将返回一个命名的2元组集: 第一组包含已完成的,第二组包含未完成的。这在您必须在给定时间内处理任务的情况下非常有用,例如,您正在进行大量REST API调用或从代理上的队列中提取消息,如果它们未能在给定的超时内完成,则可能尝试以不同的方式处理它们。
原文出自:Asyncio Event Loops Tutorial
任何基于asyncio的Python程序的主要组件都必须是底层的事件循环。在这个事件循环中,我们可以(来自官方文档):
-
注册,执行和取消调用
-
启动子进程和关联的传输以与外部程序进行通信
-
将代价高昂的函数调用委托给线程池
基本上所有事件循环都是等待事件发生,然后将每个事件匹配到我们已经明确匹配所述事件类型的函数。
一个很好的例子是一个简单的Web服务器,比如说我们的服务器上有一个Web端,它为我们的网站提供了大量不同的页面。我们的事件循环基本上监听请求,然后将这些请求中的每一个与其关联的网页进行匹配。
在上面的示例中对我们的Web服务器发出的每个请求都将被视为一个单独的 event 。然后,这些事件与我们在触发所述事件时预定义的集合函数匹配。
入门:
让我们快速看看如何定义一个非常简单的事件循环。为了实例化一个事件循环,我们将使用asyncio.get_event_loop()
将其包裹在try... finally 我们将指定我们希望新实例化的事件循环运行,直到它完成 myCoroutine() 函数。
import asyncio

# 定义一个想要被执行的协程
async def my_coroutine():
    print("my_coroutine")

# 启动快速简单的事件循环并运行直到完成
loop = asyncio.get_event_loop()
try:
   loop.run_until_complete(my_coroutine())
finally:
   loop.close()
其他运行的参数
我们有许多运行事件循环的选项,我们可以调用run_forever(),然后运行我们的事件循环,直到调用**stop()**函数.
或者我们可以调用 run_until_complete(future) 并且只运行我们的事件循环,直到完成了我们传入的对象
The run_until_complete()方法:
我们快速浏览一下 run_until_complete()函数 ,在这个例子中,我们将定义myWork()协程,然后我们将其传递给run_until_complete函数,然后我们让我们的事件循环运行起来,直到完成 myWork() 协程的执行。
import asyncio
import time


async def my_work():
    print("开始执行任务")
    time.sleep(5)
    print("任务完成")

loop = asyncio.get_event_loop()
try:
    loop.run_until_complete(my_work())

finally:
    loop.close()
run_forever()方法:
启动事件循环的另一种方法是调用**run_forever()**方法,该方法随后将启动基于asyncio的事件循环,并使其无限期运行,直到程序结束或调用 stop() 方法。应该注意的是,调用它会导致我们的主线程无限期地阻塞。
我们来看一个快速示例,展示这种方法的用法。我们将首先定义我们的 **work()**协程,它将以无限期运行的while循环为特色,并以1秒的间隔打印出 Task 执行完成。
import asyncio


async def work():
    while True:
        await asyncio.sleep(1)
        print("Task 执行完成")

loop = asyncio.get_event_loop()
try:
    asyncio.ensure_future(work())
    loop.run_forever()
except KeyboardInterrupt:
    pass
finally:
    print("关闭Loop")
    loop.close()
运行多个协程
如果你想无限期地并行运行多个协程,那么你可以通过创建x个协程并让它们分别运行while循环来实现。
然后调用 asyncio.ensure_future(function()) 将其添加在loop, 被加入的协程将在启动loop后无限期的运行。
import asyncio
import time


async def first_worker():
    while True:
        await asyncio.sleep(1)
        print("第一个任务完成")


async def second_worker():
    while True:
        await asyncio.sleep(1)
        print("第二个任务完成")


loop = asyncio.get_event_loop()
try:
    asyncio.ensure_future(first_worker())
    asyncio.ensure_future(second_worker())
    loop.run_forever()
except KeyboardInterrupt:
    pass
finally:
    print("关闭 Loop")
    loop.close()
原文出自:Asyncio Semaphores and Bounded Semaphores Tutorial
在本教程中,我们将查看信号量和有界信号量以及它们如何在Asyncio框架内工作。
什么是信号量?
信号量最初是铁路系统架构的关键部分,著名的 Dijkstra 将这个现实世界的概念转化为我们的计算世界。
这些信号量有一个内部计数器,无论何时进行获取或释放调用,它都会递增和递减。
假设我们使用信号量保护了一个代码块,并将信号量的初始值设置为2.如果一个worker获取了信号量,我们的信号量的值将减少为1,如果第二个worker出现信号量的值将减少到0。
此时,如果另一worker出现并再次尝试,则会被拒绝。这些信号量的价值在于它们允许我们保护资源不被过度使用。
实现:
现在我们已经基本了解了什么是信号量,现在让我们看看如何在基于Asyncio的Python程序中使用它们。
在这个例子中,我们将创建一个信号量的简单实例,然后创建3个将尝试获取所述信号量的工作函数。这个信号量的初始值将是2,因此我们将看到我们的两个工作函数成功获取信号量然后释放它并允许我们的第三个工作者然后获取它。
import asyncio


async def my_worker(semaphore):
    await semaphore.acquire()
    print("成功获得了信号量")
    await asyncio.sleep(3)
    print("释放信号量")
    semaphore.release()


async def main():
    my_semaphore = asyncio.Semaphore(value=2)
    await asyncio.wait([my_worker(my_semaphore), my_worker(my_semaphore), my_worker(my_semaphore)])
    print("Main 协程")

loop = asyncio.get_event_loop()
loop.run_until_complete(main())
print("所有 Workers 完成")
loop.close()
输出
当我们运行这个时,我们应该看到我们的前两个 Workers 能够获得信号量然后释放它,然后允许我们的第三个Workers继续自己获取信号量。
Note: 另一种写法:
import asyncio

my_semaphore = asyncio.Semaphore(value=2)


async def my_worker():
    with (await my_semaphore):
        print("成功获得了信号量")
        await asyncio.sleep(3)

    print("释放信号量")


async def main():
    await asyncio.wait([my_worker(), my_worker(), my_worker()])
    print("Main 协程")

loop = asyncio.get_event_loop()
loop.run_until_complete(main())
print("所有 Workers 完成")
loop.close()
有界信号量
普通信号量和有界信号量之间存在非常微妙的差异。有界信号量仅在不允许进行更多发布方面有所不同。如果它超过该值,则引发ValueError。
异常记录
问题描述:
一个使用 Apscheduler 定时启动 Aiohttp 下载文件的小工具,在不使用 apscheduler 的时候,可以正常工作。
使用 apscheduler 后则会类似出现以下错误:
loop = asyncio.get_event_loop()
File "/usr/local/python3.7.4/lib/python3.7/asyncio/events.py", line 644, in get_event_loop
% threading.current_thread().name)
RuntimeError: There is no current event loop in thread 'ThreadPoolExecutor-0_1'.
在查看 get_event_loop 源码的时候,发现以下问题:
def get_event_loop():
    """Return an asyncio event loop.

    When called from a coroutine or a callback (e.g. scheduled with call_soon
    or similar API), this function will always return the running event loop.

    If there is no running event loop set, the function will return
    the result of `get_event_loop_policy().get_event_loop()` call.
    """
    # NOTE: this function is implemented in C (see _asynciomodule.c)
    current_loop = _get_running_loop()
    if current_loop is not None:
        return current_loop
    return get_event_loop_policy().get_event_loop()
注释中很明确的说明:当从协程中调用时,此函数将始终返回正在运行的 loop, 而不是新建 Loop
至此异常根源明白:由于我是在 Apscheduler 线程中运行的 Loop 所以,在get_event_loop 时获取到的是 Apscheduler 的创建的线程,而 Apscheduler 的线程并不是一个loop 所以就会抛出以上错误。
解决办法:
很简单,修改成以下这样即可:
loop = asyncio.new_event_loop()
asyncio.set_event_loop(loop)
显式设置一下事件循环即可。
Python3 进程卡死调试方法
环境:Ubuntu(apt 包管理发行版本操作类似)、Python3.6(其余版本操作类似)
症状:线上一个 Python 进程总是莫名卡死,无日志输出。
调试步骤:
-
安装基础包:
-
-
apt update
apt install gdb python-dbg
-
-
找到当前Python 版本的 gdb.py 文件
-
-
find / -name *gdb.py
-
-
找到如下格式文件
-
-
/usr/share/gdb/auto-load/usr/bin/python3.6-gdb.py
-
-
找到需要 debug 的 Python 进程
-
-
ps -aux | grep python
-
root 147 0.0 0.5 1025752 44400 ? Sl Aug23 0:00 python3 main.py
- 进入进程

- - ```shell
    gdb python3 147
    # 请注意!!! gdb 后面的解释器,必须是调试进程所使用的解释器!!!!
    ```

- 加载 gdb.py 文件

- - ```shell
    (gdb) source /usr/share/gdb/auto-load/usr/bin/python3.6-gdb.py
    ```

- 查看卡在那一行代码了(可以看标记显示卡在了 **self._sock.recv_into(b) ** 调用上 )

- - ```shell
    (gdb) py-list
     584            self._checkReadable()
     585            if self._timeout_occurred:
     586                raise OSError("cannot read from timed out object")
     587            while True:
     588                try:
    >589                    return self._sock.recv_into(b)
     590                except timeout:
     591                    self._timeout_occurred = True
     592                    raise
     593                except error as e:
     594                    if e.args[0] in _blocking_errnos:
    ```

- 查看回溯

- - ```shell
    (gdb) py-bt
    Traceback (most recent call first):
      File "/usr/local/python3.7.4/lib/python3.7/socket.py", line 589, in readinto
        return self._sock.recv_into(b)
      File "/usr/local/python3.7.4/lib/python3.7/smtplib.py", line 387, in getreply
        line = self.file.readline(_MAXLINE + 1)
      File "/usr/local/python3.7.4/lib/python3.7/smtplib.py", line 338, in connect
        (code, msg) = self.getreply()
      File "/usr/local/python3.7.4/lib/python3.7/smtplib.py", line 251, in __init__
        (code, msg) = self.connect(host, port)
      File "/home/work/public/mail.py", line 62, in create_connection
        smtp_obj = smtplib.SMTP(self.host)
      File "/home/work/public/mail.py", line 45, in send
        mail_conn = self.create_connection
      File "/home/work/app/xxx.py", line 416, in send_report
        _subtype='HTML'
      File "/home/work/app/xxx.py", line 355, in download_work
        self.send_report("xxxxx")
      File "/home/work/app/xxx.py", line 398, in branch
        self.download_work(task)
      File "/home/work/app/xxx.py", line 434, in start_work
        dbs.branch(task)
      File "/usr/local/python3.7.4/lib/python3.7/multiprocessing/process.py", line 99, in run
        self._target(*self._args, **self._kwargs)
      File "/usr/local/python3.7.4/lib/python3.7/multiprocessing/process.py", line 297, in _bootstrap
        self.run()
      File "/usr/local/python3.7.4/lib/python3.7/multiprocessing/popen_fork.py", line 74, in _launch
        code = process_obj._bootstrap()
      File "/usr/local/python3.7.4/lib/python3.7/multiprocessing/popen_fork.py", line 20, in __init__
        self._launch(process_obj)
      File "/usr/local/python3.7.4/lib/python3.7/multiprocessing/context.py", line 277, in _Popen
        return Popen(process_obj)
      File "/usr/local/python3.7.4/lib/python3.7/multiprocessing/context.py", line 223, in _Popen
        return _default_context.get_context().Process._Popen(process_obj)
      File "/usr/local/python3.7.4/lib/python3.7/multiprocessing/process.py", line 112, in start
        self._popen = self._Popen(self)
      File "main.py", line 63, in main
        p.start()
      File "main.py", line 83, in <module>
        main()
    (gdb)
    ```

以上完毕!!!
问题:
在工作中发现在Python函数进行参数传递的时候,有的时候传递给函数的原始参数,会随着函数的修改而改变。有的时候却不会?就像下面这样:
def exchange_a(a):
    # 修改a
    a += 1
    print(f"函数修改后a: {a}")
    print(f"函数修改后a内存地址:{id(a)}")


def exchange_b(b):
    # 修改b
    b[1] = 20
    print(f"函数修改后b:{b}")
    print(f"函数修改后b内存地址:{id(b)}")


if __name__ == '__main__':
    a = 10
    exchange_a(a)
    print(f"原始参数a: {a}")
    print(f"原始参数a的内存地址: {id(a)}\n\n\n")

    b = [10, 20, 30, 40]
    exchange_b(b)
    print(f"原始参数b: {b}")
    print(f"原始参数b的内存地址:{id(b)}")
输入如下:
函数修改后a: 11
函数修改后a内存地址:4398085776
原始参数a: 10
原始参数a的内存地址: 4398085744


函数修改后b:[10, 30, 30, 40]
函数修改后b内存地址:4405688136
原始参数b: [10, 30, 30, 40]
原始参数b的内存地址:4405688136
应该已经注意到了,我们函数a的没有改变原传递参数,而且修改后的内存地址也变了;函数b改变了原参数,并且内存地址没有变。
可以再试试string tuple 和 dict的区别 会发现结果是一样的。
这是为什么呢?
Python不允许程序员选择采用传值还是传引用。
正确的叫法应该是叫传对象或者说传对象引用。函数参数在传递过程中将整个对象传入,
对可变对象的修改在函数外部以及内部可见,可变对象:list dict
调用者和被调用者之间共享这个对象。而
对于不可变对象,由于并不能被真正被修改,因此,修改往往是通过生成一个新对象然后
赋值来实现。不可变对象:String Int Tuple
当我们在实际工作中要注意这点,在操作list 或者dict时,注意是否有被修改。必要时使用copy一份确保不会被修改
前言
在公司使用PySpark处理ElasticSearch中的数据。在连接ElasticSearch是死活报错:
import os
from urllib.parse import urlsplit

from pyspark import SparkConf, SparkContext
from pyspark.sql import SQLContext

os.environ['PYSPARK_SUBMIT_ARGS'] = '--jars /Users/thsheep/Downloads/elasticsearch-hadoop-5.3.2/dist/elasticsearch-spark-20_2.10-5.3.2.jar pyspark-shell'


if __name__ == '__main__':
    conf = SparkConf().setAppName("ESTest")
    sc = SparkContext(conf=conf)
    sqlContext = SQLContext(sc)
    query = """
    {
  "query": {
    "bool": {
      "must": [
        {
          "term": {
            "type.keyword": "搜索引擎"
          }
        }
      ],
      "must_not": [],
      "should": []
    }
  }
}
    """
    es_read_conf = {
        "es.nodes": "http://elasticsearch.web.zz",
        "es.port": "9200",
        "es.resource": "eduaio/text",
        "es.input.json": "yes",
        "es.query": query,
    }
    es_rdd = sc.newAPIHadoopRDD(
        inputFormatClass='org.elasticsearch.hadoop.mr.EsInputFormat',
        keyClass='org.apache.hadoop.io.NullWritable',
        valueClass='org.elasticsearch.hadoop.mr.LinkedMapWritable',
        conf=es_read_conf
    )
    sqlContext.createDataFrame(es_rdd).collect()
: org.elasticsearch.hadoop.EsHadoopIllegalArgumentException: No data nodes with HTTP-enabled available
在翻了一堆GitHub Issue 和 Google 之后在官方文档找到了这么一段描述:
In an ideal setup, elasticsearch-hadoop achieves best performance when Elasticsearch and Hadoop are fully accessible from every other, that is each node on the Hadoop side can access every node inside the Elasticsearch cluster. This allows maximum parallelism between the two system and thus, as the clusters scale out so does the communication between them.
However not all environments are setup like that, in particular cloud platforms such as Amazon Web Services, Microsoft Azure or Google Compute Engine or dedicated Elasticsearch services like Cloud that allow computing resources to be rented when needed. The typical setup here is for the spawned nodes to be started in the cloud, within a dedicated private network and be made available over the Internet at a dedicated address. This effectively means the two systems, Elasticsearch and Hadoop/Spark, are running on two separate networks that do not fully see each other (if at all); rather all access to it goes through a publicly exposed gateway.
Running elasticsearch-hadoop against such an Elasticsearch instance will quickly run into issues simply because the connector once connected, will discover the cluster nodes, their IPs and try to connect to them to read and/or write. However as the Elasticsearch nodes are using non-routeable, private IPs and are not accessible from outside the cloud infrastructure, the connection to the nodes will fail.
There are several possible workarounds for this problem:
大意是说:Elastic-Hadoop 在Hadoop和Elasticsearch 能完全访问时能实现性能最大化!因为没个Hadoop节点都能直接访问ElasticSearch这样能实现并行最大化。Elastic-Hadoop默认采用这种方式。但是在我们通常情况下ElasticSearch和Hadoop节点不能互相访问。但是我们的程序会启动时候对集群节点IP进行 写入 和 读取操作。所以会造成连接失败。
解决办法:
官方文档给出了解决办法,前两个我们忽略。需要更改基础架构,第三种就不需要了
Introduced in 2.2, elasticsearch-hadoop can be configured to run in WAN mode that is to restrict or completely reduce its parallelism when connecting to Elasticsearch. By setting es.nodes.wan.only, the connector will limit its network usage and instead of connecting directly to the target resource shards, it will make connections to the Elasticsearch cluster only through the nodes declared in es.nodes settings. It will not perform any discovery, ignore data or client nodes and simply make network call through the aforementioned nodes. This effectively ensures that network access happens only through the declared network nodes.
Last but not least, the further the clusters are and the more data needs to go between them, the lower the performance will be since each network call is quite expensive.
大意是: 我们可以设置 es.nodes.wan.only 来不进行检查。
我们来看看配置参数 es.nodes.wan.only 参数:
es.nodes.wan.only (default false) Whether the connector is used against an Elasticsearch instance in a cloud/restricted environment over the WAN, such as Amazon Web Services. In this mode, the connector disables discovery and only connects through the declared es.nodes during all operations, including reads and writes. Note that in this mode, performance is highly affected.
其默认为:false 我们只需要将其设置为 true即可。
注意: 此处明显提示会对性能产生很大影响。因此对新能有要求的话还是使用 第一种和第二种解决办法比较好。
 es_read_conf = {
        "es.nodes": "http://elasticsearch.web.zz",
        "es.port": "9200",
        "es.resource": "eduaio/text",
        "es.input.json": "yes",
        "es.query": query,
        "es.nodes.wan.only": "true"
    }
这样就可以了。
异常问题:
在使用 concurrent.futures.ProcessPoolExecutor 出现一下异常:
TypeError: cannot pickle '_thread.lock' object
伪代码如下:
import concurrent.futures


class test:

    def __init__(self):
        """初始化一些东西"""

    def foo1(self, x):
        """一些代码"""
        return self.foo2(x)

    def foo2(self, x):
        """一些代码"""
        return x + x

    def run(self):
        data = [1, 2, 3, 4, 5, 6]
        with concurrent.futures.ProcessPoolExecutor(max_workers=5) as executor:
            for v, result in zip(data, executor.map(self.foo1, data)):
                print(f"{v} result: {result}")
问题原因
因为multiprocess进程池内部中使用了pickle模块进行序列化,但是传的参数是类下面定义的方法,所以无法序列化
解决办法
伪代码如下
小技巧
通常我们将字典转换为query string 的时候非常方便,Python提供内置方法;但是反过来却没有内置方法,但是我们可以这样:
a = "https://mp.weixin.qq.com/s?__biz=MzIzNzA4NDk3Nw==&mid=2457736062&idx=1&sn=82b59e93f8648cf7343cd2b4fb7ecc41&chksm=ff44bb20c8333236f1798f3790a7886088e58871fba315c5ea319a6772c7b91211b1608421b2&mpshare=1&scene=1&srcid=0615ejI92JB3sw1rj0mVg72L#rd"
import urllib
query = urllib.parse.urlparse(a).query
dict([(k, v[0]) for k, v in urllib.parse.parse_qs(query).items()])
Out[5]:
{'__biz': 'MzIzNzA4NDk3Nw==',
 'chksm': 'ff44bb20c8333236f1798f3790a7886088e58871fba315c5ea319a6772c7b91211b1608421b2',
 'idx': '1',
 'mid': '2457736062',
 'mpshare': '1',
 'scene': '1',
 'sn': '82b59e93f8648cf7343cd2b4fb7ecc41',
 'srcid': '0615ejI92JB3sw1rj0mVg72L'}
以上完毕!
Scrapy-Redis 详解
通常我们在一个站站点进行采集的时候,如果是小站的话 我们使用scrapy本身就可以满足。
但是如果在面对一些比较大型的站点的时候,单个scrapy就显得力不从心了。

要是我们能够多个Scrapy一起采集该多好啊 人多力量大。
很遗憾Scrapy官方并不支持多个同时采集一个站点,虽然官方给出一个方法:
将一个站点的分割成几部分 交给不同的scrapy去采集
似乎是个解决办法,但是很麻烦诶!毕竟分割很麻烦的哇
下面就改轮到我们的额主角Scrapy-Redis登场了!

什么??你这么就登场了?还没说为什么呢?
好吧 为了简单起见 就用官方图来简单说明一下:

这张图大家相信大家都很熟悉了。重点看一下SCHEDULER
-
先来看看官方对于SCHEDULER的定义:
SCHEDULER接受来自Engine的Requests,并将它们放入队列(可以按顺序 优先级),以便在之后将其提供给Engine
-
现在我们来看看SCHEDULER都提供了些什么功能:
根据官方文档说明 在我们没有没有指定 SCHEDULER 参数时,默认使用:'scrapy.core.scheduler.Scheduler' 作为SCHEDULER(调度器)
scrapy.core.scheduler.py
class Scheduler(object):

    def __init__(self, dupefilter, jobdir=None, dqclass=None, mqclass=None,
                 logunser=False, stats=None, pqclass=None):
        self.df = dupefilter
        self.dqdir = self._dqdir(jobdir)
        self.pqclass = pqclass
        self.dqclass = dqclass
        self.mqclass = mqclass
        self.logunser = logunser
        self.stats = stats
        # 注意在scrpy中优先注意这个方法,此方法是一个钩子 用于访问当前爬虫的配置
    @classmethod
    def from_crawler(cls, crawler):
        settings = crawler.settings
        # 获取去重用的类 默认:scrapy.dupefilters.RFPDupeFilter
        dupefilter_cls = load_object(settings['DUPEFILTER_CLASS'])
        # 对去重类进行配置from_settings 在 scrapy.dupefilters.RFPDupeFilter 43行
        # 这种调用方式对于IDE跳转不是很好  所以需要自己去找
        # @classmethod
        # def from_settings(cls, settings):
        #     debug = settings.getbool('DUPEFILTER_DEBUG')
        #     return cls(job_dir(settings), debug)
        # 上面就是from_settings方法 其实就是设置工作目录 和是否开启debug
        dupefilter = dupefilter_cls.from_settings(settings)
        # 获取优先级队列 类对象 默认:queuelib.pqueue.PriorityQueue
        pqclass = load_object(settings['SCHEDULER_PRIORITY_QUEUE'])
        # 获取磁盘队列 类对象(SCHEDULER使用磁盘存储 重启不会丢失)
        dqclass = load_object(settings['SCHEDULER_DISK_QUEUE'])
        # 获取内存队列 类对象(SCHEDULER使用内存存储 重启会丢失)
        mqclass = load_object(settings['SCHEDULER_MEMORY_QUEUE'])
        # 是否开启debug
        logunser = settings.getbool('LOG_UNSERIALIZABLE_REQUESTS', settings.getbool('SCHEDULER_DEBUG'))
        # 将这些参数传递给 __init__方法
        return cls(dupefilter, jobdir=job_dir(settings), logunser=logunser,
                   stats=crawler.stats, pqclass=pqclass, dqclass=dqclass, mqclass=mqclass)


    def has_pending_requests(self):
      """检查是否有没处理的请求"""
        return len(self) > 0

    def open(self, spider):
      """Engine创建完毕之后会调用这个方法"""
        self.spider = spider
        # 创建一个有优先级的内存队列 实例化对象
        # self.pqclass 默认是:queuelib.pqueue.PriorityQueue
        # self._newmq 会返回一个内存队列的 实例化对象 在110  111 行
        self.mqs = self.pqclass(self._newmq)
        # 如果self.dqdir 有设置 就创建一个磁盘队列 否则self.dqs 为空
        self.dqs = self._dq() if self.dqdir else None
        # 获得一个去重实例对象 open 方法是从BaseDupeFilter继承的
        # 现在我们可以用self.df来去重啦
        return self.df.open()

    def close(self, reason):
      """当然Engine关闭时"""
          # 如果有磁盘队列 则对其进行dump后保存到active.json文件中
        if self.dqs:
            prios = self.dqs.close()
            with open(join(self.dqdir, 'active.json'), 'w') as f:
                json.dump(prios, f)
        # 然后关闭去重
        return self.df.close(reason)

    def enqueue_request(self, request):
      """添加一个Requests进调度队列"""
          # self.df.request_seen是检查这个Request是否已经请求过了 如果有会返回True
        if not request.dont_filter and self.df.request_seen(request):
              # 如果Request的dont_filter属性没有设置(默认为False)和 已经存在则去重
            # 不push进队列
            self.df.log(request, self.spider)
            return False
        # 先尝试将Request push进磁盘队列
        dqok = self._dqpush(request)
        if dqok:
              # 如果成功 则在记录一次状态
            self.stats.inc_value('scheduler/enqueued/disk', spider=self.spider)
        else:
              # 不能添加进磁盘队列则会添加进内存队列
            self._mqpush(request)
            self.stats.inc_value('scheduler/enqueued/memory', spider=self.spider)
        self.stats.inc_value('scheduler/enqueued', spider=self.spider)
        return True

    def next_request(self):
      """从队列中获取一个Request"""
          # 优先从内存队列中获取
        request = self.mqs.pop()
        if request:
            self.stats.inc_value('scheduler/dequeued/memory', spider=self.spider)
        else:
              # 不能获取的时候从磁盘队列队里获取
            request = self._dqpop()
            if request:
                self.stats.inc_value('scheduler/dequeued/disk', spider=self.spider)
        if request:
            self.stats.inc_value('scheduler/dequeued', spider=self.spider)
        # 将获取的到Request返回给Engine
        return request

    def __len__(self):
        return len(self.dqs) + len(self.mqs) if self.dqs else len(self.mqs)

    def _dqpush(self, request):
        if self.dqs is None:
            return
        try:
            reqd = request_to_dict(request, self.spider)
            self.dqs.push(reqd, -request.priority)
        except ValueError as e:  # non serializable request
            if self.logunser:
                msg = ("Unable to serialize request: %(request)s - reason:"
                       " %(reason)s - no more unserializable requests will be"
                       " logged (stats being collected)")
                logger.warning(msg, {'request': request, 'reason': e},
                               exc_info=True, extra={'spider': self.spider})
                self.logunser = False
            self.stats.inc_value('scheduler/unserializable',
                                 spider=self.spider)
            return
        else:
            return True

    def _mqpush(self, request):
        self.mqs.push(request, -request.priority)

    def _dqpop(self):
        if self.dqs:
            d = self.dqs.pop()
            if d:
                return request_from_dict(d, self.spider)

    def _newmq(self, priority):
        return self.mqclass()

    def _newdq(self, priority):
        return self.dqclass(join(self.dqdir, 'p%s' % priority))

    def _dq(self):
        activef = join(self.dqdir, 'active.json')
        if exists(activef):
            with open(activef) as f:
                prios = json.load(f)
        else:
            prios = ()
        q = self.pqclass(self._newdq, startprios=prios)
        if q:
            logger.info("Resuming crawl (%(queuesize)d requests scheduled)",
                        {'queuesize': len(q)}, extra={'spider': self.spider})
        return q

    def _dqdir(self, jobdir):
        if jobdir:
            dqdir = join(jobdir, 'requests.queue')
            if not exists(dqdir):
                os.makedirs(dqdir)
            return dqdir
只挑了一些重点的写了一些注释剩下大家自己领会(才不是我懒哦 )
从上面的代码 我们可以很清楚的知道 SCHEDULER的主要是完成了 push Request pop Request 和 去重的操作。
而且queue 操作是在内存队列中完成的。
大家看queuelib.queue就会发现基于内存的(deque)
那么去重呢?
scrapy.dupefilters.py
class RFPDupeFilter(BaseDupeFilter):
    """Request Fingerprint duplicates filter"""

    def __init__(self, path=None, debug=False):
        self.file = None
        self.fingerprints = set()
        self.logdupes = True
        self.debug = debug
        self.logger = logging.getLogger(__name__)
        if path:
              # 此处可以看到去重其实打开了一个名叫 requests.seen的文件
            # 如果是使用的磁盘的话
            self.file = open(os.path.join(path, 'requests.seen'), 'a+')
            self.file.seek(0)
            self.fingerprints.update(x.rstrip() for x in self.file)

    @classmethod
    def from_settings(cls, settings):
        debug = settings.getbool('DUPEFILTER_DEBUG')
        return cls(job_dir(settings), debug)

    def request_seen(self, request):
        fp = self.request_fingerprint(request)
        if fp in self.fingerprints:
              # 判断我们的请求是否在这个在集合中
            return True
        # 没有在集合就添加进去
        self.fingerprints.add(fp)
        if self.file:
            self.file.write(fp + os.linesep)
按照正常流程就是大家都会进行重复的采集;我们都知道进程之间内存中的数据不可共享的,那么你在开启多个Scrapy的时候,它们相互之间并不知道对方采集了些什么那些没有没采集。那就大家伙儿自己玩自己的了。完全没没有效率的提升啊!

怎么解决呢?
这就是我们Scrapy-Redis解决的问题了,不能协作不就是因为Request 和 去重这两个 不能共享吗?
那我把这两个独立出来好了。
将Scrapy中的SCHEDULER组件独立放到大家都能访问的地方不就OK啦!加上scrapy-redis后流程图就应该变成这样了👇
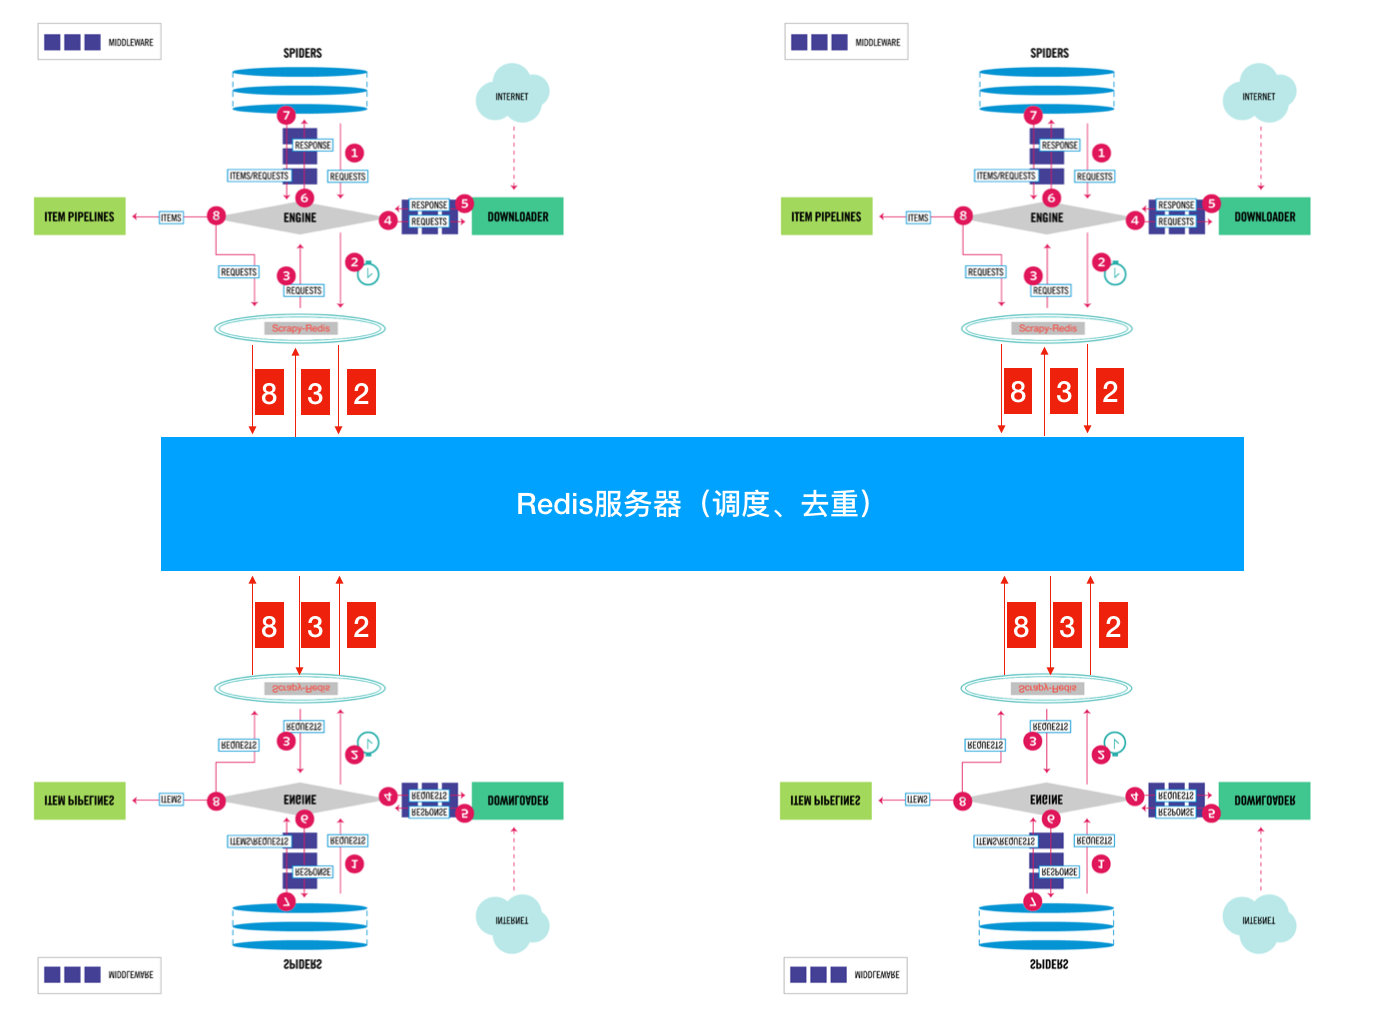
So············· 这样是不是看起来就清楚多了???
下面我们来看看Scrapy-Redis是怎么处理的👇
scrapy_redis.scheduler.py 来先来看看
class Scheduler(object):
    """Redis-based scheduler

    Settings
    --------
    SCHEDULER_PERSIST : bool (default: False)
        Whether to persist or clear redis queue.
    SCHEDULER_FLUSH_ON_START : bool (default: False)
        Whether to flush redis queue on start.
    SCHEDULER_IDLE_BEFORE_CLOSE : int (default: 0)
        How many seconds to wait before closing if no message is received.
    SCHEDULER_QUEUE_KEY : str
        Scheduler redis key.
    SCHEDULER_QUEUE_CLASS : str
        Scheduler queue class.
    SCHEDULER_DUPEFILTER_KEY : str
        Scheduler dupefilter redis key.
    SCHEDULER_DUPEFILTER_CLASS : str
        Scheduler dupefilter class.
    SCHEDULER_SERIALIZER : str
        Scheduler serializer.

    """

    def __init__(self, server,
                 persist=False,
                 flush_on_start=False,
                 queue_key=defaults.SCHEDULER_QUEUE_KEY,
                 queue_cls=defaults.SCHEDULER_QUEUE_CLASS,
                 dupefilter_key=defaults.SCHEDULER_DUPEFILTER_KEY,
                 dupefilter_cls=defaults.SCHEDULER_DUPEFILTER_CLASS,
                 idle_before_close=0,
                 serializer=None):
        """Initialize scheduler.

        Parameters
        ----------
        server : Redis
            这是Redis实例
        persist : bool
            是否在关闭时清空Requests.默认值是False。
        flush_on_start : bool
            是否在启动时清空Requests。 默认值是False。
        queue_key : str
            Request队列的Key名字
        queue_cls : str
            队列的可导入路径(就是使用什么队列)
        dupefilter_key : str
            去重队列的Key
        dupefilter_cls : str
            去重类的可导入路径。
        idle_before_close : int
            等待多久关闭

        """
        if idle_before_close < 0:
            raise TypeError("idle_before_close cannot be negative")

        self.server = server
        self.persist = persist
        self.flush_on_start = flush_on_start
        self.queue_key = queue_key
        self.queue_cls = queue_cls
        self.dupefilter_cls = dupefilter_cls
        self.dupefilter_key = dupefilter_key
        self.idle_before_close = idle_before_close
        self.serializer = serializer
        self.stats = None

    def __len__(self):
        return len(self.queue)

    @classmethod
    def from_settings(cls, settings):
        kwargs = {
            'persist': settings.getbool('SCHEDULER_PERSIST'),
            'flush_on_start': settings.getbool('SCHEDULER_FLUSH_ON_START'),
            'idle_before_close': settings.getint('SCHEDULER_IDLE_BEFORE_CLOSE'),
        }

        # If these values are missing, it means we want to use the defaults.
        optional = {
            # TODO: Use custom prefixes for this settings to note that are
            # specific to scrapy-redis.
            'queue_key': 'SCHEDULER_QUEUE_KEY',
            'queue_cls': 'SCHEDULER_QUEUE_CLASS',
            'dupefilter_key': 'SCHEDULER_DUPEFILTER_KEY',
            # We use the default setting name to keep compatibility.
            'dupefilter_cls': 'DUPEFILTER_CLASS',
            'serializer': 'SCHEDULER_SERIALIZER',
        }
        # 从setting中获取配置组装成dict(具体获取那些配置是optional字典中key)
        for name, setting_name in optional.items():
            val = settings.get(setting_name)
            if val:
                kwargs[name] = val

        # Support serializer as a path to a module.
        if isinstance(kwargs.get('serializer'), six.string_types):
            kwargs['serializer'] = importlib.import_module(kwargs['serializer'])
                # 或得一个Redis连接
        server = connection.from_settings(settings)
        # Ensure the connection is working.
        server.ping()

        return cls(server=server, **kwargs)

    @classmethod
    def from_crawler(cls, crawler):
        instance = cls.from_settings(crawler.settings)
        # FIXME: for now, stats are only supported from this constructor
        instance.stats = crawler.stats
        return instance

    def open(self, spider):
        self.spider = spider

        try:
              # 根据self.queue_cls这个可以导入的类 实例化一个队列
            self.queue = load_object(self.queue_cls)(
                server=self.server,
                spider=spider,
                key=self.queue_key % {'spider': spider.name},
                serializer=self.serializer,
            )
        except TypeError as e:
            raise ValueError("Failed to instantiate queue class '%s': %s",
                             self.queue_cls, e)

        try:
              # 根据self.dupefilter_cls这个可以导入的类 实例一个去重集合
            # 默认是集合 可以实现自己的去重方式 比如 bool 去重
            self.df = load_object(self.dupefilter_cls)(
                server=self.server,
                key=self.dupefilter_key % {'spider': spider.name},
                debug=spider.settings.getbool('DUPEFILTER_DEBUG'),
            )
        except TypeError as e:
            raise ValueError("Failed to instantiate dupefilter class '%s': %s",
                             self.dupefilter_cls, e)

        if self.flush_on_start:
            self.flush()
        # notice if there are requests already in the queue to resume the crawl
        if len(self.queue):
            spider.log("Resuming crawl (%d requests scheduled)" % len(self.queue))

    def close(self, reason):
        if not self.persist:
            self.flush()

    def flush(self):
        self.df.clear()
        self.queue.clear()

    def enqueue_request(self, request):
      """这个和Scrapy本身的一样"""
        if not request.dont_filter and self.df.request_seen(request):
            self.df.log(request, self.spider)
            return False
        if self.stats:
            self.stats.inc_value('scheduler/enqueued/redis', spider=self.spider)
        # 向队列里面添加一个Request
        self.queue.push(request)
        return True

    def next_request(self):
      """获取一个Request"""
        block_pop_timeout = self.idle_before_close
        # block_pop_timeout 是一个等待参数 队列没有东西会等待这个时间  超时就会关闭
        request = self.queue.pop(block_pop_timeout)
        if request and self.stats:
            self.stats.inc_value('scheduler/dequeued/redis', spider=self.spider)
        return request

    def has_pending_requests(self):
        return len(self) > 0
以上就是Scrapy-Redis中的SCHEDULER模块。下面我们来看看queue和本身的什么不同:
scrapy_redis.queue.py
以最常用的优先级队列 PriorityQueue 举例:
class PriorityQueue(Base):
    """Per-spider priority queue abstraction using redis' sorted set"""
        """其实就是使用Redis的有序集合 来对Request进行排序,这样就可以优先级高的在有序集合的顶层 我们只需要"""
    """从上往下依次获取Request即可"""
    def __len__(self):
        """Return the length of the queue"""
        return self.server.zcard(self.key)

    def push(self, request):
        """Push a request"""
        """添加一个Request进队列"""
        # self._encode_request 将Request请求进行序列化
        data = self._encode_request(request)
        """
        d = {
        'url': to_unicode(request.url),  # urls should be safe (safe_string_url)
        'callback': cb,
        'errback': eb,
        'method': request.method,
        'headers': dict(request.headers),
        'body': request.body,
        'cookies': request.cookies,
        'meta': request.meta,
        '_encoding': request._encoding,
        'priority': request.priority,
        'dont_filter': request.dont_filter,
        'flags': request.flags,
        '_class': request.__module__ + '.' + request.__class__.__name__
            }

        data就是上面这个字典的序列化
        在Scrapy.utils.reqser.py 中的request_to_dict方法中处理
        """

        # 在Redis有序集合中数值越小优先级越高(就是会被放在顶层)所以这个位置是取得 相反数
        score = -request.priority
        # We don't use zadd method as the order of arguments change depending on
        # whether the class is Redis or StrictRedis, and the option of using
        # kwargs only accepts strings, not bytes.
        # ZADD 是添加进有序集合
        self.server.execute_command('ZADD', self.key, score, data)

    def pop(self, timeout=0):
        """
        Pop a request
        timeout not support in this queue class
        有序集合不支持超时所以就木有使用timeout了  这个timeout就是挂羊头卖狗肉
        """
        """从有序集合中取出一个Request"""
        # use atomic range/remove using multi/exec
        """使用multi的原因是为了将获取Request和删除Request合并成一个操作(原子性的)在获取到一个元素之后 删除它,因为有序集合 不像list 有pop 这种方式啊"""
        pipe = self.server.pipeline()
        pipe.multi()
        # 取出 顶层第一个
        # zrange :返回有序集 key 中,指定区间内的成员。0,0 就是第一个了
        # zremrangebyrank:移除有序集 key 中,指定排名(rank)区间内的所有成员 0,0也就是第一个了
        # 更多请参考Redis官方文档
        pipe.zrange(self.key, 0, 0).zremrangebyrank(self.key, 0, 0)
        results, count = pipe.execute()
        if results:
            return self._decode_request(results[0])
以上就是SCHEDULER在处理Request的时候做的操作了。
是时候来看看SCHEDULER是怎么处理去重的了!
scrapy_redis.dupefilter.py
只需要注意这个👇方法即可:
def request_seen(self, request):
  """Returns True if request was already seen.

        Parameters
        ----------
        request : scrapy.http.Request

        Returns
        -------
        bool

        """
  # 通过self.request_fingerprint 会生一个sha1的指纹
  fp = self.request_fingerprint(request)
  # This returns the number of values added, zero if already exists.
  # 添加进一个集合如果存在会返回0  不存在返回1
  added = self.server.sadd(self.key, fp)
  return added == 0
这样大家就都可以访问同一个Redis 获取同一个spider的Request 在同一个位置去重,就不用担心重复啦
大概就像这样:
spider1:检查一下这个Request是否在Redis去重,如果在就证明其它的spider采集过啦!不在就添加进调度队列,等待别 人获取。自己继续干活抓取网页 产生新的Request了 重复之前步骤。
spider2:以相同的逻辑执行
可能有些小伙儿会产生疑问了~~!spider2拿到了别人的Request了 怎么能正确的执行呢?逻辑不会错吗?
这个不用担心啦 因为整Request当中包含了,所有的逻辑,回去看看上面那个序列化的字典。
总结一下:
-
Scrapy-Reids 就是将Scrapy原本在内存中处理的 调度(就是一个队列Queue)、去重、这两个操作通过Redis来实现
-
多个Scrapy在采集同一个站点时会使用相同的redis key(可以理解为队列)添加Request 获取Request 去重Request,这样所有的spider不会进行重复采集。效率自然就嗖嗖的上去了。
-
Redis是原子性的,好处不言而喻(一个Request要么被处理 要么没被处理,不存在第三可能)
另外Scrapy-Redis本身不支持Redis-Cluster,大量网站去重的话会给单机很大的压力(就算使用boolfilter 内存也不够整啊!)
改造方式很简单:
-
使用 rediscluster 这个包替换掉本身的Redis连接
-
Redis-Cluster 不支持事务,可以使用lua脚本进行代替(lua脚本是原子性的哦)
- 注意使用lua脚本 不能写占用时间很长的操作(毕竟一大群人等着操作Redis 你总不能让人家等着吧)
以上!完毕
对于懒人小伙伴儿 看看这个我改好的: 集群版Scrapy-Redis PS: 支持Python3.6+ 哦 ! 其余的版本没测试过
